We Painted a Giant Mural on a Pizza Restaurant
Skip to the bottom if you just want a breakdown on our costs and tips for painting your own mural. Read on if you want the story of how two men, who had no idea what they were doing, pulled off a massive mural in a night + day.

Me & my dad at work.
If we’re friends and you somehow don’t know, my parents own a pizza restaurant called Old School Pizza Co. in the beautiful St. Thomas, Ontario. My parents launched this business almost a year ago after having previously ran a pizza place for 5 years when they still lived in Walkerton, Ontario.
I had the pleasure of helping my parents brand Old School and establish their social media; all of which has been a really fun journey. My dad, ever the handyman, actually did the vast majority of all the interior construction work himself, from laying floor to running electrical and plumbing, knocking down walls and putting up new ones.
We decided, after their building got a fresh coat of paint, to add to my dad’s list of handyman talents by painting a big mural on the side of the building.
For context, here’s the building pre-mural:

Naked as the day she was born.
My parents approached me a number of weeks prior to our adventure about helping them design some sort of sign they could create (more talents) and then install on their building. I reminded them about what my vision had always been for their exterior: a mural that would cover the corner of the building and be a more permanent solution (and hopefully less maintenance!).
At that point, I’d done this mock-up so they could see what I had in mind:

Here’s what we were aiming for (minus the awning. That’s a Phase 2 job).
They were sold. There were some things technicalities they needed to work out with the awning graphics, but the giant pizza slice and the scaled logo were both within the realm of possibility.
The biggest hurdle we’d have to clear: none of us had ever painted a mural before; much less one of this scale and visibility.
I’ve always joked that if our family had a motto, it would be, “We’ll think of something.” My parents have a knack for finding themselves in unique positions where they have no choice but to figure something out, and they always seem to, no matter how down to the wire it becomes. You can love it or hate it but that’s just who my parents are, and there’s probably elements of it that I’ve adopted too.
Anyways, for the next few weeks, I’d spent some of my down time researching the best paints, brushes, the best techniques to get a mural onto a building, and everything else I could learn about how to pull this off.
It wouldn’t be fair to say the stakes were particularly high on this project. If we screwed up or it totally failed, we’d just paint over it. The cost of materials was relatively cheap (I’ll break those down below). The biggest thing was our time we’d invested, and the public embarrassment of having attempted a mural and failed. The relational stakes were definitely the biggest thing. But nonetheless, we charged into the project headfirst, believing that if we didn’t allow failure to be an option, it wouldn’t be.
Our tentative plan was going to be to secure an old school (ha!) overhead projector and use transparencies to display our designs up onto the wall. We’d then paint in where the overhead told us to, and move onto the other side. We were going to start when it got dark enough to see a projector on the wall outside, and when the shop was closed the following day to give my dad and I as much runway as possible for painting.
Cue the weekend of our paint night. I had finally found a free weekend between client work and all my other obligations, and Leanne and I packed up the van with our kids, toys, overnight bags, paint supples, and headed southwest to St. Thomas.
The evening rolled around and my dad was getting stuff prepped at the shop before I was to come down. “The projector isn’t turning on” he texted me. “I think the bulb is blown.”
“Be right down,” I replied, and headed over to the shop. He was right. The projector we’d secured was, indeed, quite old, and the bulb had given out on the night we were about to use it. Frantically checking all local stores and Amazon, we realized we were dead in the water waiting on a new bulb. We weren’t going to be doing the mural tonight after all.
Two weekends later, I carved out some time in my schedule to pack up the family once again and head down to St. Thomas once more. With a new bulb in hand and 2 Lo-Cal Monster energy drinks at the ready, we were prepared this time.
In hindsight, that bulb burning out before we even began was a blessing. If the bulb was going to burn out that night, it would’ve really sucked if it happened at any point after we’d begun. Here’s why:
The process of setting up the projector in exactly the right spot—to get placement of the logo right and distortion from the glass elements low—was all quite an endeavour. As you can see in the photos below, we had lifted the projector as (relatively) high as we could, knowing that having the head of the projector at the same height as the centre of the logo would provide the least distortion. To get it perfectly level and the transparency aligned, we had to really finesse it and mess with it until we were happy. There was still a minor bit of distortion that was visible in a few letters, but to the average viewer it was essentially nothing. I knew I’d be able to compensate for that when painting.
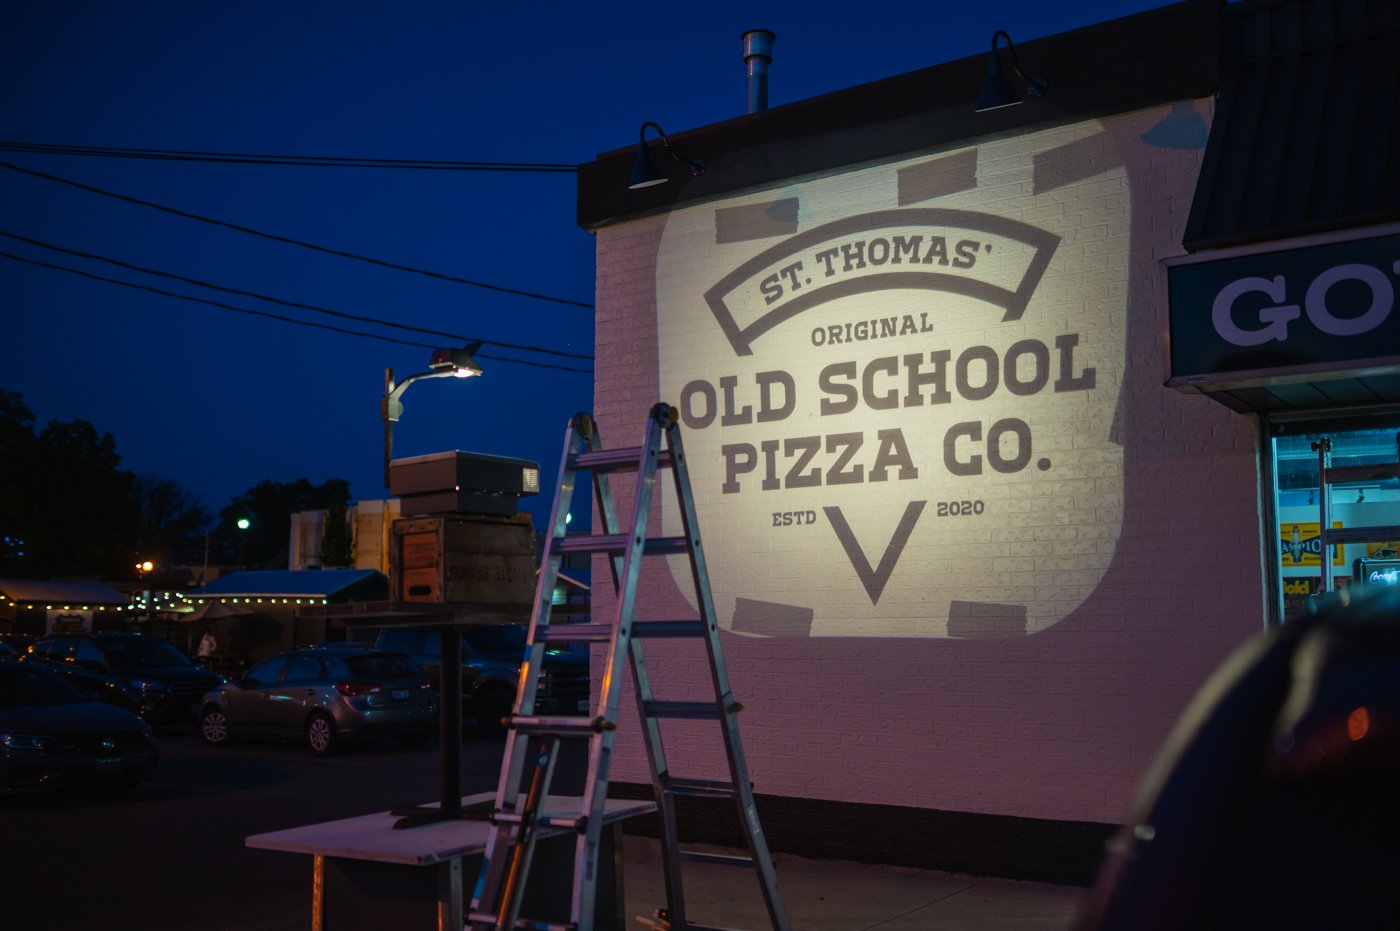
Roughing in where the logo will go.
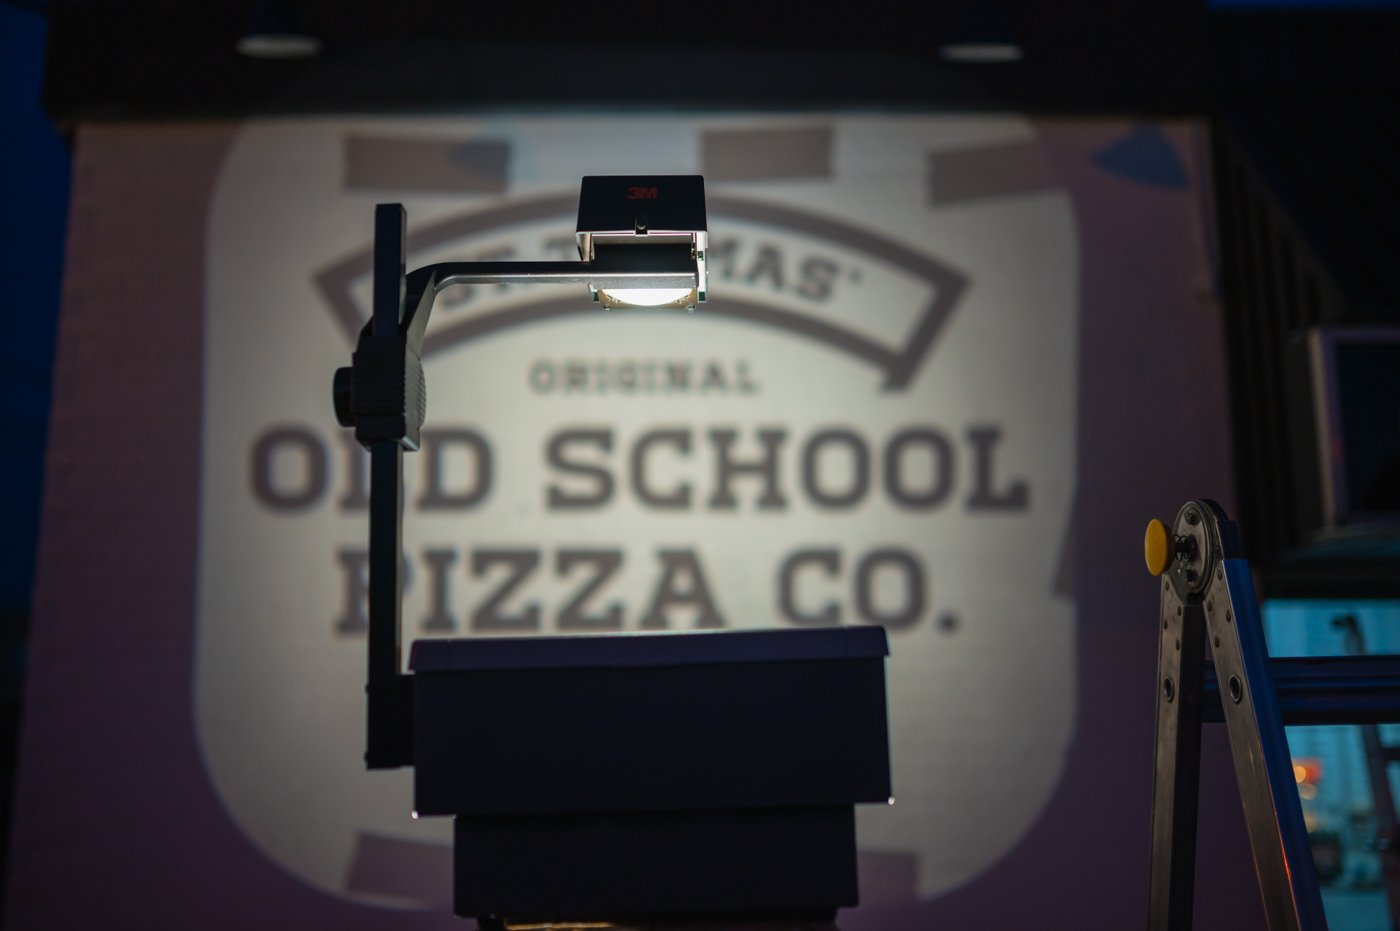
The projector that almost wasn’t.

Final snap before getting going.
Finally, after nailing the placement, getting the projector perfectly level, with a fresh bulb and a clear night ahead of us, my dad and I began.
My dad’s idea was to get the entire logo outlined in sharpie before I began painting anything. Originally, I thought we’d just have the projector on the entire time I was painting, but he smartly predicted that if we had to call it an early night or had to move the projector for any reason, it would be impossible to get the projector back in the exact X/Y/Z position. So I spent the first hour of my time just outlining the entire logo on the wall.
What I quickly realized was going to provide us a huge headache was the textured brick we were painting on. This wasn’t your standard brick with mortar in between. This brick had pieces of the brick missing and dented to create a unique texture up close. Of course, it had been layered in years of different coats of paint, so it wasn’t like anything was particularly jagged. But when you’re talking about the precision of fractions of an inch at times, it wasn’t going to make our jobs any easier.
After I’d gotten the logo outlined, the shop closed for the night and my dad was free to help out with the other side of the mural: the pizza slice. I stopped what I was doing to help him get the placement perfect (a much precise task, so it was considerably less agonizing) and he was able to use painter’s tape for the vast majority of the slice instead of having to outline like I did.

Slicing and dicing.
In no time, he was able to start painting and I’d gone back to the logo.
We started setting up the projector around 8pm. I think I was done outlining the logo by about 10pm. Pausing to help my dad draft the slice and then resume painting myself, below is where we were at around 12 midnight or so (I was probably 1 Monster deep at this point).

Art ain’t easy.
Muraling isn’t quick work in our experience. We had no frame of reference for how long painting might take, so we just had no clue what to anticipate. The night went on and we chipped away at the mural brick by brick.
At some point during painting, we both got an intense case of the munchies (no, we didn’t smoke anything), so we called my brother Zachary to grab us some McDonalds fries to snack on during a brief intermission before painting resumed. Forgot to snap photos of our snack because we were too hungry to pause longer than we had to. One large fry (and another Lo-Cal Monster) later, and we were back to painting.
Below you can see what I meant about the textured brick. My dad wasn’t able to just use a roller onto the wall: he had to take a brush and attack each section from every angle in order to properly coat the wall with paint.

My dad, always the joker, starting to make a goofy face.
My dad and I are great at egging each other on, so we both stayed considerably later than we thought we might have to. I won’t say we made less progress than we’d expected, but we knew to do it properly would mean going home, sleeping a few hours, then coming back in the morning to wrap it up.

Baggy paint sweats and flip flops. The epitome of class.
It was around 4:30am when we called it quits for the evening. Here’s where we got to:

Calling it a night (early morning) before returning the next day (later that morning).
I don’t know what waking up the next morning was like for my dad, but for me it was pretty easy despite the lack of proper sleep. I think we were both pretty amped up on adrenaline (of a relative sort) to see our project through to the end. I think we were back around 9am or 10am.

Seeing it through.
The nerve racking part of the entire process was: up close and personal, on that textured brick, we felt like we were doing a horrible job staying within the lines or creating clean edges. The whole time you’re painting, it’s a battle between the wet, jet-black paint on the brush and the alpine white wall in front of you. The vertical nature also meant gravity was working against us. I think I only dripped twice, and they landed within another letter, so nothing was ever really visible in the end.

Detail work.

Getting there.

The top was hard to reach!
When you’re viewing the mural with your face pressed against the brick, it’s easy to feel like you suck. Everything sucks. Murals suck. Why did I think I could do this? But when you stepped back, it all started coming together, and you realize those fractions-of-an-inch clean edges weren’t nearly as important in scale to the foot-tall letters viewed from 20 to 30 feet away.

Texture: the blessing and curse.
Finally, sometime around noon, we wrapped painting. We did it! What an accomplishment!

Contrast, baby.

From the top down.
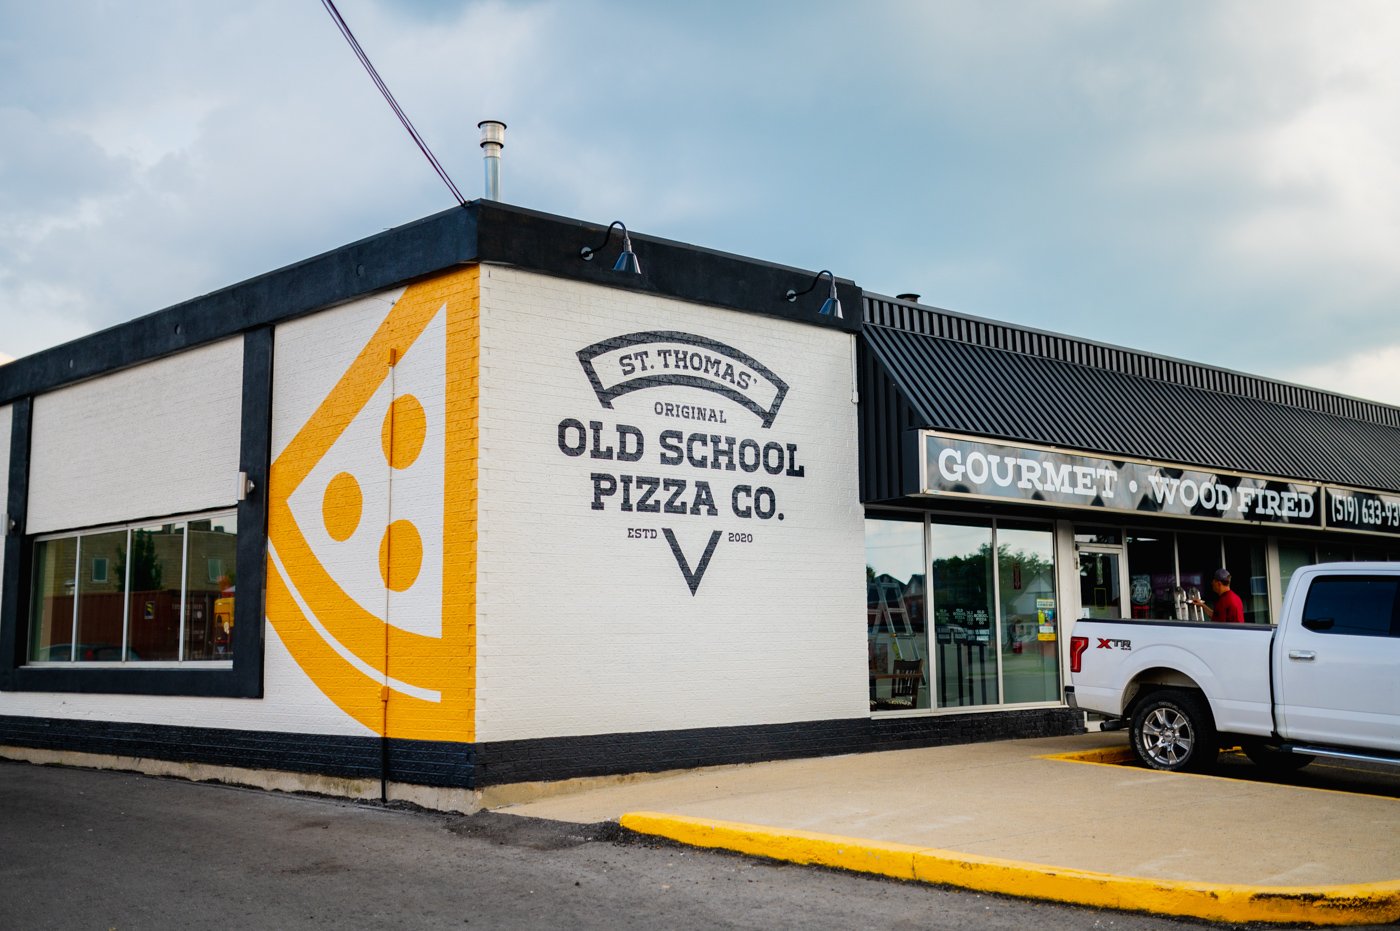
There she is!

Monster pepperonis.
Now that we’d made it that far, the worry in our minds shifted to: I hope it’ll last. And we were about to find out how good my research was on weather-proofing our paint, because storm clouds were rolling in in a hurry.
An hour later, we were swimming in my parents’ pool when we had to clear out because rain and thunder had taken over the sky. It wasn’t just a light sprinkle: it became a downpour. I was admittedly way more nervous about the mural than I let on to anyone. All I could picture was our beautiful mural being squandered like bleeding mascara because Mother Nature didn’t give us enough time to let our mural dry.
My dad was more optimistic, but I had to do a drive-by on our way back to Hamilton to see.
Surely, he was right. Our mural was going to survive the elements.
We’d done it. We painted a giant mural on our pizza restaurant. What an accomplishment.
While we checked it out from up close, we also drove by from Talbot Street (St. Thomas’s downtown road) to see what the mural looked like where there’s more traffic.

The view from Talbot Street.
Needless to say, we were feeling good.
Cost of Materials
Like I’ve said many times, we were complete newbies going into this, so we had no idea what to anticipate for anything. I’ll try to give you a breakdown of everything below if you’re contemplating something similar:
1. Overhead Projector with new bulb - $70
This was a difficult item to secure online. We finally found someone semi-local who was selling one for a reasonable price. Of course, we had to replace the bulb which was an additional cost. We had Amazon Prime, so we didn’t pay for shipping which was nice.
2. Transparencies - $10
We needed 2 transparencies—one for the logo, one for the pizza slide—and they came to about $10 from an office supply place.
3. Black Paint - $150
It was advised we use Golden Fluid Acrylic paints because they hold up well outdoors and won’t need a clear coating to seal them. All my art store had was 16oz bottles which retailed for $50 each. Not cheap. I bought 3 because I’d rather have too much instead of running out. In the end, I didn’t even use a complete bottle on the black logo (and I was fairly liberal about how much paint I used). It’s sort of impossible to predict how much paint you need but I’d still err on too much than too little.
The other thing I’d really advise: don’t cheap out on paints. There are many areas you can cut costs in your mural, but this is not one of them. This is the part that will stay up on the wall when you’re finished this project. If you don’t want it sun-bleached or peeling in no time, use high quality paints. I’d highly recommend Golden paints, and they’re the only thing I’d use in the future.
4. Artist’s Brushes - $16
I went to your typical craft store and bought 2 different sizes: one a rounded tip (both very soft bristles) at about 1” wide, and a second (similar style and feel) 1.5” wide as well. I ended up using the smaller one almost exclusively, but it was nice to have the second (and my dad was able to use it on his half of the mural). These brushes were literally only $8 each and they were worth their weight in gold. I would’ve paid quadruple that price for how much easier they made my life. At one point, I switched to a dollar-store brush for a super fine detail, and the stiff bristles were already such a nightmare that I switched back a soon as I could. If you don’t cheap out on paint, you also shouldn’t cheap out on brushes. Clean it when you’re done and you still keep it. I can’t recommend this enough.
5. Regular old Brushes - $10
For the pizza slice, we didn’t need as precise a brush. I think my dad primarily used a 2.5” wide standard brush that was in the standard paint bin at Canadian Tire. For big broad areas where there’s lots of room for error, this is a great option.
6. Orange Paint - $100
We specifically went with Sherwin Williams paint for the slice because it was a brand colour, but knowing it was another premium exterior paint was worth the peace of mind. We didn’t cheap out here either, and are eternally grateful. I think we bought a full gallon and only used half of it (or so). Plenty leftover for touchups or use elsewhere.
7. Paint containers - $10
We used a variety of little plastic cups and containers my parents have on hand at the restaurant for sauces and dips. If you had to buy them at a store, you wouldn’t be out more than ten bucks.
8. Drop sheets - $10
I bought these from the dollar store and they were hardly necessary, but it was nice to know I wasn’t going to stain the sidewalk if I dripped. Again, these are items you can re-use, and you definitely don’t need anything amazing here.
9. Ladders & Platforms - Already owned
If you’re painting up high, you’re going to need a ladder. A-frames are nicer because they aren’t pressed against the wall you’re painting on, but sometimes you don’t have a choice. My dad owned a combination ladder which fit the bill really well (despite being as heavy as a dump truck). I don’t want to know what these cost new but I’d hope you could find something used, or you’ll just have to invest in something to have longterm. I’m not counting these in the cost of the project because what you need will vary based on your mural and what you already have access to.
10. Painter’s Tape - $10
We are big fans of the FrogTape (Leanne refuses to buy anything else. She’s right). A standard roll of 1” thick tape isn’t much. Again though, for us, this wasn’t the most useful tool because of the texture of our wall. Know what you’re painting on before you buy too many rolls of this (unless you’re just happy to have a supply for when you need it).
11. Snacks & Energy Drinks - $25
Food and drink are vital to life. Energy drinks aren’t cheap. McDonalds is. You don’t need to buy snacks when muralling, but it’s highly recommended.
Total cost: $411+tax
Not bad, all things considered! As you can see, the paint and the brushes were the biggest costs. The brushes, ladders, drop sheets, and overhead are all investments that can mitigate costs in the future for repeated painting. We don’t have any real plans to do more murals (or at least not many more), so that part’s a bit of a bummer, but having the right tools made the job so, so much easier. When you’re up against your own inexperience, it’s really helpful to know you haven’t cut too many corners on materials that are going to complicate the process.

With the company vehicle out front.
My Tips for Painting
Alright, remember how I said we had no idea what we were doing? We really didn’t. I watched a few videos on how to do your first mural, but many of them glossed over the process. I’ll attempt to divulge some of the things I learned along the way that might help you out.
1. Don’t Cheap Out On Materials
If you’ve actually read this entire blog you’ll have heard me say this a few times already, but it bears repeating: do not cheap out on paint and brushes of all things. If your mural ages rapidly, all of your time and effort will be considerably wasted. This was a mistake we managed to sidestep, but I highly advise everyone else do the same!
2. Don’t Forget a Before & After Photo
It can be easy to get going without snapping a before photo. Thankfully, as a photographer, this wasn’t as much of a concern. Nonetheless, make sure you’re taking a photo before you get rolling!
3. Outline in Sharpie Before Painting
This was my dad’s idea and it was a complete game-changer. It would’ve been a mistake to do otherwise. Translate your design from projector onto the wall as quickly as possible to avoid any alignment issues; particularly if your design is as complex as ours was.
4. It’ll Take Longer Than You Think
Especially in your first job. Allot more time than you think you’re going to need to get the job done. Don’t put too high of expectations on yourself to get it done in a particular time window.
5. Thoroughly Test Your Projector / Transfer Method
If you aren’t using an overhead projector—maybe you’re using a digital projector or the grid method—make sure you’ve tested that it’s not going to fail on you in the middle of the project. What seemed like a hindrance when our bulb burned out was a blessing in disguise. We’d have been in a real pickle if our projector died a couple hours into the job.
6. Prep Your Surface, Know Your Surface
I mentioned the textured brick we were painting on and how much it complicated the process and lengthened the time it took us to execute. Because it had been recently painted in the weeks prior to our mural, we knew it was going to be relatively clean and ready to be painted directly onto. If necessary, prime your wall so you don’t need multiple coats on your mural (something you absolutely do not want at all). In addition to that, in order to better estimate your time and setbacks, know what the texture of your wall is and how that will affect the final product. While the textured brick of our mural was annoying, it probably helped hide a lot of the little imperfections in our technique.
7. Step Back Often
When you’re working at such a close distance, it can be easy to lose the whole scale of the project. For your own morale and peace of mind, step back often to appreciate the progress you’re making. Even if it is slow going, seeing that you’re slowly, slowly getting there can be enough to motivate you to keep going.
8. Enjoy the Process
Recognize that the hours you spend in painting this mural are going to be exponential to the length of time this mural will be enjoyed. What we were able to do in about 16 hours is something that will serve the restaurant for literally years and years to come. What an amazing return on investment. While painting is slow (and at times agonizing), it’ll be over before you know it. Enjoy the process.
9. Bring Company
Knocking this project out with my dad was a lot of fun. Podcasts and music are nice, but having someone to chat with, give advice with, contemplate with, and celebrate the small victories with is irreplaceable. If you follow our practice of painting all night, you might have a harder time securing someone to hang with you, but try anyways! You might be able to lure someone into accompanying you by offering them the opportunity to contribute at some point.
In Summary
This was one crossed off the bucket list for me. I had a blast doing it, even during the wee hours of the morning and when it felt the most monotonous and tiresome. Getting to hang out with my dad while we were working was also a particular highlight. Any project my dad and I get to work on together is a treat.
In all relativity, I was surprised at how easy this is. I absolutely believe anyone with enough confidence can pull it off. After all, we had no idea what we were doing! But we knew we’d think of something, and we did.
Now, plan your trip to Old School to see it in person. If you’re not yet convinced, just check out their menu (bacon cheeseburger pizza, anyone?). You won’t be disappointed. Tell my parents I sent you!

Father & son.